QtLogbook User Manual

Paul Cantrell
Version 0.92
February 10, 2008
Overview............................................................................................................................. 3
Description....................................................................................................................... 3
Target Audience............................................................................................................... 3
QtLogbook Looks Like A Paper
Logbook...................................................................... 3
How To Use The Mouse
Wheel...................................................................................... 3
How To Use The Context
Menu...................................................................................... 3
Running QtLogbook For The
First Time............................................................................. 4
Choosing A Date Format................................................................................................. 4
Choosing A Time Format................................................................................................ 5
Structure Of A Logbook...................................................................................................... 6
Overview......................................................................................................................... 6
Moving Around In The
Logbook.................................................................................... 6
Setting the Layout Of A
Logbook.................................................................................... 7
Column Layout................................................................................................................ 8
Creating A New Logbook
Type....................................................................................... 8
Changing An Existing
Logbook Type............................................................................. 9
Changing The Name Of A
Column............................................................................... 10
Adding A New Column Type........................................................................................ 12
Adding Flights To A
Logbook.......................................................................................... 14
Setting The Date Field.................................................................................................... 14
Entering Dates Using The
Pop Up Calendar.................................................................. 16
Setting Text Fields......................................................................................................... 17
Setting Numeric Fields................................................................................................... 20
Cut/Copy/Paste.................................................................................................................. 22
Managing Logbook Files................................................................................................... 25
Save............................................................................................................................... 25
Save As.......................................................................................................................... 25
Open.............................................................................................................................. 25
Close.............................................................................................................................. 25
New............................................................................................................................... 25
Managing Multiple
Logbooks............................................................................................ 26
Creating A New Logbook.............................................................................................. 26
Clearing An Existing
Logbook...................................................................................... 26
Moving Between Logbooks........................................................................................... 26
Customizing Logbook
Layout........................................................................................ 26
Using The Report Window................................................................................................ 27
Selecting Aircraft Type
To Summarize.......................................................................... 28
Importing Existing
Logbooks............................................................................................ 29
From Excel..................................................................................................................... 29
Format Of The XML File -
To be supplied........................................................................ 29
Release Notes..................................................................................................................... 29
Overview
Description
QtLogbook is designed as a simple to use pilot logbook
spreadsheet. You can adjust the display of logbook data to look exactly like
your paper logbook. This not only simplifies entering data from your paper
logbook, it makes it easier to keep the paper and electronic logbooks in sync.
Target
Audience
I wrote QtLogbook for my own use and other pilots like
myself. I generally carry my paper logbook in my flightbag or a piece of paper
so that I can note down the details of the flights on any given day. I tend to
update my paper logbook every day or two with the full details of the flight,
but then when I fill a page I need to update the totals. I used to use Excel
for this purpose, but Excel is slow to launch and a lot of trouble to navigate.
I also used a separate database so that I could do queries when the insurance
companies or FAA needed my pilot hour breakdowns. This meant I ended up
entering data twice.
QtLogbook is a way to both update the paper logbook
totals, and to generate summaries of pilot time.
QtLogbook
Looks Like A Paper Logbook
There are other logbook programs which have a data entry
format specific to the program, i.e. a page of fields which you can enter
details into. One of the goals of QtLogbook was to make the data entry and
display look identical to your paper logbook to facilitate keeping the two in
sync. It also makes it easier to learn the program because you can treat it
like a regular paper logbook.
How
To Use The Mouse Wheel
The first release of QtLogbook is on Macintosh OSX, and
many Macintosh computers have a single button mouse with no scroll wheel. As
far as I know, scroll wheel mice came out of the Windows environment, but they
are well supported on OSX. If you don’t have one you may eventually consider
purchasing one as they really do make it easier to navigate documents. The
newer Apple mice have built in scroll capability, and QtLogbook allows you to
make use of this capability if you have it. In addition, the newer laptops with
a touchpad allow you to scroll by dragging with two fingers.
Most numeric entry fields and combo menus in QtLogbook
will respond to mouse scroll events.
How
To Use The Context Menu
QtLogbook makes extensive use of context menus. On the
Macintosh you can either use a 3 button mouse by clicking the right hand
button, or you can hold down the CTRL button while clicking with a single
button mouse. The result is a pop-up menu which you can select items from.
Running
QtLogbook For The First Time
The first time that you run QtLogbook, the program doesn’t
find a logbook file, so it puts up a dialog box asking for the location of the
file.
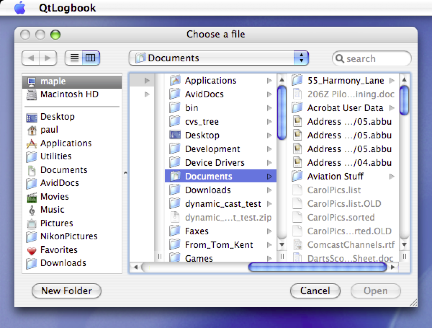
You can just cancel the dialog box and QtLogbook will
create a default logbook for you.
Choosing
A Date Format
You can choose from two ways of displaying
dates: Month, Day, Year and Day, Month, Year. Use the preferences dialog to
change the way the program shows dates:
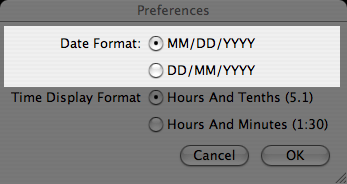
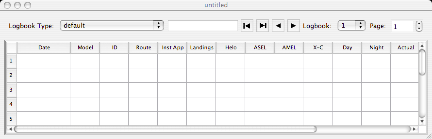
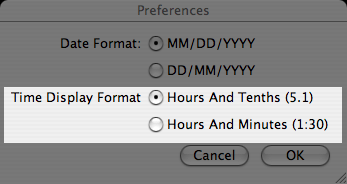
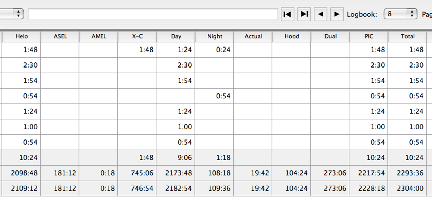
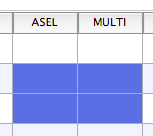
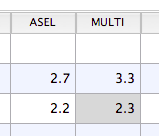
Choosing A Time Format
You can choose from two ways of displaying
your aircraft time: Tenths of hours, and Hours:Minutes. Use the preferences
dialog to change the way the program shows your flight time:
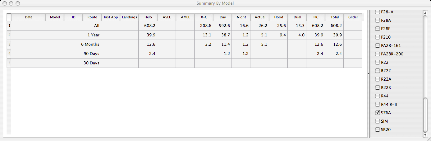
If you select Hours:Minutes, your logbook
page will look like this:
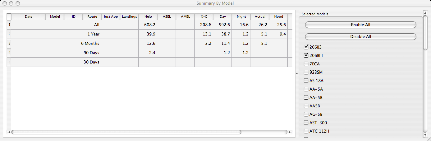
Structure Of A Logbook
Overview
QtLogbook stores the information about your logbooks in
a single XML file. You add logbook descriptions to make the electronic logbooks
look like your paper ones. You do this by creating logbook descriptions. These
describe what the order of columns are, and how many lines to a page the
logbook has. QtLogbook then displays the information to you a page at a time.
Moving
Around In The Logbook
QtLogbook has several ways to navigate the various pages of
your logbook:
Using The First Page Last Page Buttons
In the toolbar you will find the “First Page” and “Last
Page” buttons:
![]()
These buttons will move you to the beginning of the logbook,
or the last occupied page, respectively.
Using The Next Page Previous Page Buttons
In the toolbar you will find the “Next Page” and
“Previous Page” buttons:

These buttons will move you to the previous or next
page. When you are at the first page of a logbook and press the “Previous Page”
button, it will take you to the last page of the previous logbook. Similarly,
when on the last page of a logbook, the “Next Page” button will take you to the
first page of the next logbook.
Using The Page Number Field
The toolbar contains the Page Number field:

This field displays the number of the current logbook
page. You can also use this field to change the logbook page, in a similar
fashion to using the “Next Page” and “Previous Page” buttons:
Changing The Page Number Using The Keyboard
If you click on the displayed page number, once it is
selected you can directly edit it using the keyboard:
![]()
Note that as you type, the page number changes, so if
you type “17” you’ll see page “1” as you type first “1” and then “7”.
Changing The Page Number Using The Mouse Wheel
You can also use the mouse wheel to scroll the number of
the page. Just select the field by clicking in it and then roll the mouse
scroll wheel up and down to change the pages.
Changing The Page Number Using The Up/Down Buttons
The Page Number field contains a set of up/down arrows:
![]()
You can click on the upper or lower arrow to increase or
decrease the page number.
Setting
the Layout Of A Logbook
You change the display format of a logbook by selecting
the type of logbook in the toolbar:
![]()
When you first use QtLogbook, the program defines a
default layout, but you can create your own to match your paper logbook format.
Column
Layout
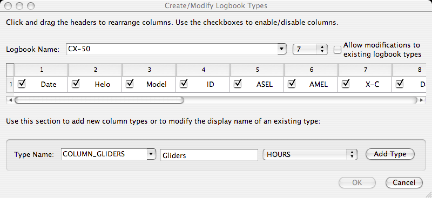
Creating
A New Logbook Type
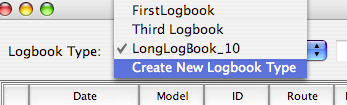
In the toolbar logbook type pulldown menu, one of the
types is “Create New Logbook Type”. Choosing this option will produce the
following dialog box:
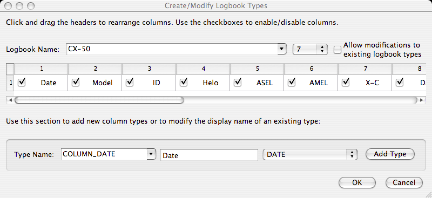
This dialog box actually performs two functions. The top half allows you to define a new logbook type, the bottom half allows you to define new column types. This section describes the top function - creating logbook descriptions.
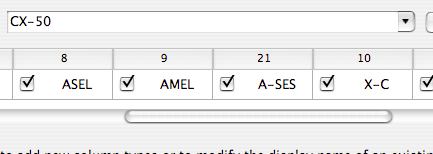
You should enter a description of the logbook type in the “Logbook Name” field. You can use any text string which is descriptive of the type of paper logbook you are using. In this example, I’ve used the made up “CX-50” name. Once you “OK” this dialog box, “CX-50” will become an entry in the logbook type pulldown menu.
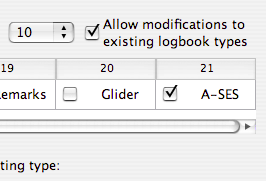
Next to the name field is a pulldown menu you use to define the page length of the logbook. The program allows you to choose any value between 4 and 31. Choose the same length as the length of your paper logbook so that the page totals will match.
Next to the page length field is a checkbox labeled “Allow modifications to existing logbook types”. Normally the dialog box will complain if you use the same identifier as an existing logbook type, however if you want to modify an existing logbook description just check this box when you enter the name of the existing logbook type. It will then modify the existing logbook description.
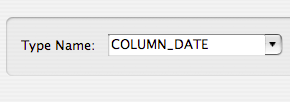
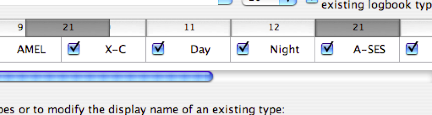
The next line down contains all the known column types. The name of the column is labeled with the “display” name of the column type. The internal name of the column (used in the XML file) can be discovered by hovering the mouse over the column name:

The checkbox determines whether the column type is
displayed for your logbook. For instance, if you don’t fly helicopters, you
probably don’t want to have a column for helicopters in your logbook. However,
if you fly gliders, you probably would want that type of column displayed.
To rearrange the column order to match that of your
paper logbook, simply click and drag on the column header numbers:
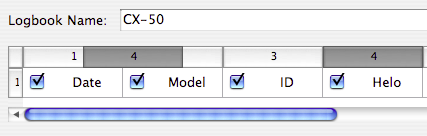
When you let go of the mouse button, the column will drop into the new location.
When you are finished, press the “OK” button and the new logbook type will be defined.
Changing
An Existing Logbook Type
As described above, you can modify a custom logbook type
by selecting the checkbox labeled thusly:
![]()
Select the Logbook Name of an existing logbook, and make
the appropriate changes.
Changing
The Name Of A Column
There are a few common reasons why you might
want to change the name of a column. Reasons might include wanting to use a
more descriptive name than the default, or changing the name to be in your
native language. To change the
name of a column, first choose the “Create New Logbook Type” pulldown menu
item:
In the dialog box, select “Allow
modifications to existing logbook types”:

Then, select the column you wish to change:
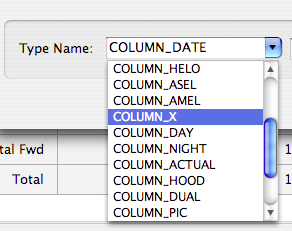
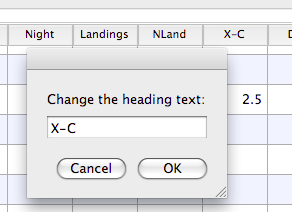
In this example, I will change “COLUMN_X”
(which is the column for cross country time).

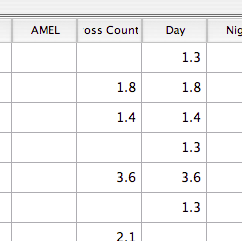
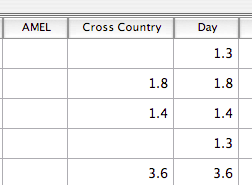
In the next box, you will see the current string which is displayed: “X-C”. We can change it to “Cross Country”:

Click “Modify Type” and then “OK”. Your logbook page will be updated:
Note, however that the string is being
truncated because the column width is too small for such a long string. You can
widen the column by clicking and dragging on the edge of the column header:
The program will remember the width of each
column in the logbook file. As of version 0.9, you can rename the column by
just double clicking on the header:
Adding A New Column Type
You will often want to add a column type
which is not included in the QtLogbook defaults. For instance, if you are a
seaplane pilot you might want to track ASES (Airplane, Single Engine Sea). You
could rename an existing column type, but a better way is to create a new
column. First, bring up the “Create New Logbook Type” dialog box.
You can start with any type name:
just click in the text field and erase back
to “COLUMN_”:
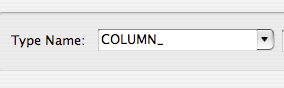
Now type in an upper case alphabetic (no
special characters) descriptive name:
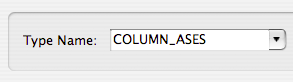
This is the string that will be stored in the
XML logbook file. You won’t see it directly, but if another program is ever
used to interpret the XML logbook file, a descriptive name will make it easier
to understand what the data means.
The next step is to pick the name which will
appear at the top of the column when the logbook page is displayed. this can be
almost any text you want, however you probably should keep the string short so
that it fits in the default width of the column. We could use “ASES”, or any
other short string that will describe the column type:

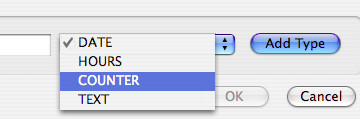
The next step is to define what kind of data the column holds. The choices are DATE, HOURS, COUNTER, TEXT. The Date type allows you to add a date column, but of course the default already has one and I can’t imagine why you would want another. HOURS means pilot time, either in hours and tenths of hours, or hours:minutes, depending on your preference setting. COUNTER is used for things like recording number of takeoffs and landings, number of instrument approaches, or other things that require an integer counter. Text lets you enter freeform text for things like registration numbers, airport identifiers, or remarks. In the example case, we’ll use HOURS because this is a pilot time column we are adding. Click the “Add Type” and then “OK” buttons. (Add Type adds the type to the types QtLogbook knows about, “OK” actually adds it to the logbook).
If you want to change the location of the column from the end, before hitting OK you can click and drag on the header and reposition the column to any position you desire.
dragged to the new position:
results in the column being placed where you designate:
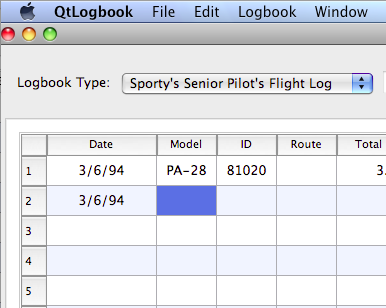
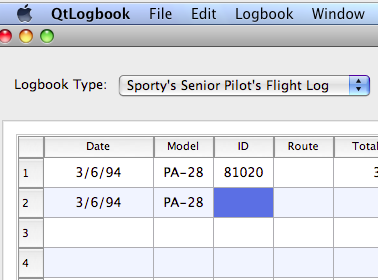
Adding Flights To A Logbook
Logbook pages start out as empty pages. Click on the
fields you wish to change.
Setting
The Date Field
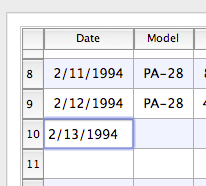
When you select the date field by clicking on it, you
can fill in the date in the preferred date format. You can then change it to record the date of a flight done
on a previous day. While entering a date, the toolbar central text field echoes
the current date you have entered:
![]()
Entering Date Fields With The Keyboard
To set the date using the keyboard, enter type in the
date in the format mm/dd/yyyy or dd/mm/yyyy depending on your preference
setting:
When you have typed enough digits for the date to be
legal, the toolbar central text field will echo the current date in long
format:
![]()
When the echoed date agrees with what you are trying to
enter, you can hit Enter, or Tab, or an arror key, or click on another cell, as
desired.
Entering Date Fields With The Mouse Wheel
With the date field selected, you can use the scroll
wheel of the mouse to increase or decrease the date under the mouse. The date
will be echoed in both the date field and in the central text field.
Entering Date Fields With The Context Menu
A special context menu is provided for dates. It
attempts to be intelligent by assuming that the date to be entered is the same
as, or later than, the previous date in the logbook. Thus you can enter the
same date repeatedly by always just selecting the top item in the context menu.
In case the flight might not be on the same day, but
might still be close to the previous entry’s date, the context menu provides
you with several subsequent dates:
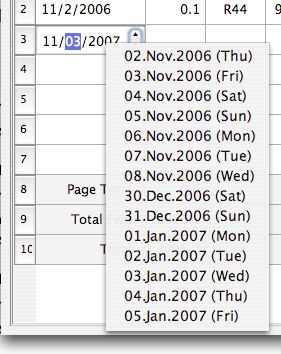
Note that the second half of the context menu contains
entries leading up to the current date (I’m writing this on the 5th
of January, so the program has provided dates for a week leading up to today).
This covers the case where you haven’t flown for over a week since the last
recorded flight.
If you are entering dates for an earlier year (such as
when you are first entering your logbook into the program) the entire context
menu will be filled with choices from that year, and none of the entries will
reflect the current date.
In general, I find that the context menu is the most
efficient way to enter dates in the logbook.
Entering Dates Using The Pop Up Calendar
To get a popup calendar dialog box, hold “option” while
ctrl-clicking or right button clicking a date.
You will get a context menu in the form of a miniature
calendar. You can pick dates from the calendar:
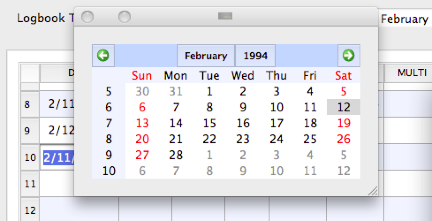
You can double click on a date, or select it and hit
“Enter” in order to accept a date from the popup. If you decide you want to
cancel out of the dialog, press the “Escape” (“esc”) button on your keyboard.
You can use the arrow keys on your
keyboard to move the selected date forward and backwards, including into other
month displays.
Setting Text Fields
Text fields allow you to enter arbitrary text into a
column. Although some fields may represent very specific types of information
(for example: the route of a flight) the program itself does not interpret the
data, so you are free to enter whatever you wish. There are certain fields
which have special meaning to the program (the COLUMN_MODEL field is used by
the summary window for instance) but you are still able to enter whatever you
wish.
When you are entering the text via the keyboard, the
toolbar central text field echos what you are typing. This is useful when the
text you wish to enter is much wider than the column in the logbook otherwise
allows you to display:
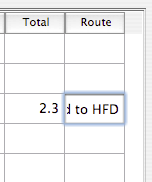
Echoes as:
![]()
in the toolbar.
Entering Text Fields With The Keyboard
Once you have selected the text field, you simply type
using your keyboard. You can move around in the field using the keyboard arrow
keys or the mouse. You can’t currently edit in the toolbar field, you must edit
in the table cell.
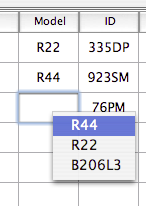
Entering Text Fields With The Context Menu
Certain text fields such as the model of the aircraft,
the aircraft registration number, etc. are highly repetitive. The program
builds a context menu sorted by most recent entry of the previous text entries
in the column. You can then quickly pick a recent aircraft, route, or other
text field using the context menu:
Entering Text Fields With The “Grab” Command
Introduced in version 0.8 is the “Grab”
command. If you select a field, either numeric or text (but not date) and hit ⌘G (ctrl-G on Windows) the
program will look up in that column and copy/paste the closest non-empty cell
into the current cell, and then select the next column to the right. This is
useful when, for instance, you’ve flown the same model and registration
aircraft on several flights. For instance, in the following example we have
done several flights in the same aircraft on the same day. We’ve entered the
date using the context menu and moved onto the next field (Model):
We hit ⌘G (ctrl-G on Windows) and the previous line is
automatically copied down, and the selection advanced to the next box:
This will even work if there is an empty line
- the program looks back until it finds a logbook entry which is non-empty to
copy from.
Setting Numeric Fields
There are two kinds of numeric fields, an integer
counter field (for counting instrument approaches, takeoff and landings, etc.)
and hours/tenths of hours (for tracking pilot time). To enter a value, click
the field with the mouse, or tab over using the tab key, so that the field is
highlighted. Then use one of the following methods to enter the time:
Entering Numeric Fields With The Keyboard
You can type the desired value. You can type “.2” and
the program will correctly enter that as “0.2”. You can enter negative numbers.
While this may seem strange, sometimes it is necessary to add a correction when
you have made a mistake in your paper logbook. The program will allow you to
enter negative values for this reason.
Entering Numeric Fields With The Mouse Wheel
Once you make the entry field selected, you can use the
mouse wheel to increase or decrease the value.
Entering Numeric Fields With The Context Menu
The program will look at recent entries in your logbook
and attempt to create a context menu of numeric values that are likely to
include the value you want to enter:
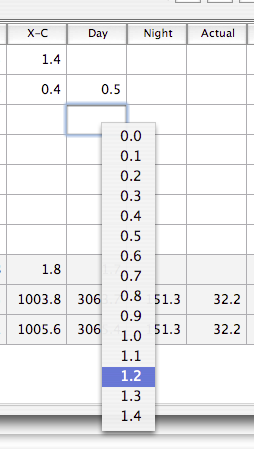
When you release the mouse, the number is entered, and
the program automatically moves onto the next field.
Entering Numeric Fields With The “Grab” Command
You can use the “Grab” command ⌘G (ctrl-G on Windows) the
same way as described above with text fields. The program will look back above
in the same column until it finds a non-empty cell and will copy that value
into the current cell and then move the selection to the next cell to the right.
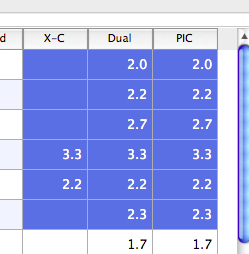
Entering
Multiple Numeric Fields With The “AutoFill” Command
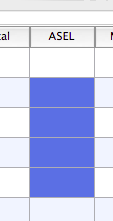
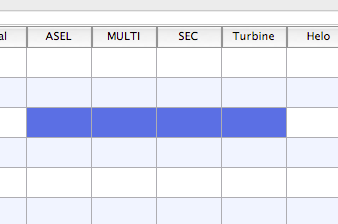
This powerful command was added because
usually I fly most flights under similar conditions, i.e. 95% of my flights are
in the helicopter, daytime, as PIC. Rather than have to enter the same numbers
in all those columns, I can enter the number in one column and then have the
rest of the columns automatically entered. For example, in this logbook I have
been flying the airplane:

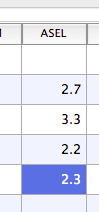
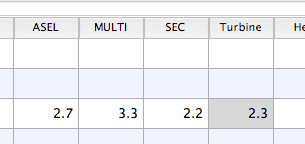
As you can see, in the previous flight,
“Total”, “ASEL”, “Hood”, “X-C”, “Dual”, and “PIC” are all similar types of
values (tenths of hours). When command ⌘A (ctrl-A on Windows) is pressed, the program
automatically copies the “2.9” in the current cell to all those other columns:

Notice that one column probably needs fixing:
Although ASEL, X-C, Dual, and PIC are all probably 2.9 (the total length of the
flight) “Hood” is probably less so that needs to be adjusted. The program is
not currently smart enough to notice that the value in “hood” is different, so
it just fills it in with the same value as all the other columns. You can just
select it and spin the mouse wheel to decrease the value to the correct amount.
The other four columns are probably correct, though, so this can be a big time
saver. Notice that the command leaves the same cell selected. If we were really
smart, we would enter “2.9” in the hood column, let it auto-fill the other
columns, and then we would already be in the “hood” column to adjust the number
down with the mouse wheel. Minor saving of keystrokes.
Cut/Copy/Paste
Version 0.92 has some major improvements to the
clipboard cut/copy/paste commands. First of all, you can cut/copy/paste
regardless of the exact selection state of a logbook cell. You can equally
cut/copy/paste in any of these states:
![]()


Further, “cut” now reliably leaves the cell cleared.
You can cut/copy/page more than one cell at a time. For
instance, the following copy operation:
will properly paste into Excel:
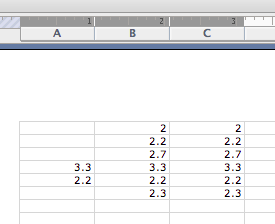
and vice versa. Further, the program attempts to be
smart when pasting into a region. For instance, if you copy a row from Excel:
![]()
You can either paste it into a column in QtLogbook:
or into a row:
or into a different shape:
In version 0.92 there is a bug in pasting columns from
Excel to QtLogbook, but this should be corrected in the near future.
Managing Logbook Files
The QtLogbook program is designed to have open a single
logbook file at a time. The name of the open file is always displayed in the
title bar of the main window. You can use the “File” menu to perform operations
on the open file.
Save
This command writes out the current logbook entries to
the XML disk file. Use it when you want to commit your changes safely to the
disk.
Save
As
The “Save As” command brings up a dialog box to allow
you to save the current logbook to a different file.
Open
Open allows you to open a different logbook file. The
current logbook file is automatically closed. If the current logbook file has
been modified, you are prompted to first save the contents before a new file is
opened. If you choose “No”, the current changes will be lost.
Close
There is no “Close” on the file entry, but using
the “Close” on the “Window” menu
will cause the file to be closed, and the program to exit. Clicking on the
“Close Window” button will accomplish the same thing. When the main window is
closed, the program will exit, thus choosing “Quit” performs the same action.
New
This command will close the currently open logbook, and
open a new, blank logbook. When you first close the new logbook, you will be
prompted for the filename. Make sure to choose a filename with an extension of
“.lbk”.
Managing
Multiple Logbooks
Creating A New Logbook
When you fill a paper logbook and want to start a new
one, you will want to do the same in QtLogbook. Choose the “New Logbook” entry
from the “Logbook” menu:

The “OK” button will not be enabled until you enter a
logbook number that does not currently exist. You can enter the logbook
description you want, or leave it as default and change it later on the main window
toolbar.
Clearing An Existing Logbook
The “Logbook->Clear Logbook” entry will clear all the
entries in a logbook back to empty. One case where it is useful is when you are
trying to import a logbook from an external source. If you import the logbook and
find problems, you can clear the logbook, fix the external file, and then try
importing again.
Moving Between Logbooks
The main window toolbar contains a pull down menu which
allows you to select which logbook you wish to view:
![]()
You can click on the menu and select one of the values,
or you can use the mouse wheel to scroll through all the logbooks. When you
select a new logbook, the program positions you on the last page with entries.
Customizing Logbook Layout
Paper logbooks typically have a number of columns with
blank headings so that you can add less common categories. For instance, most
logbooks do not have a column for helicopter time. QtLogbook allows you to add
your own columns using the “Create New Logbook Type” entry on the “Logbook
Type” pull down menu on the toolbar. The second half of this dialog box allows
you to add new column types to the logbook. For instance, in this example, a
column for gliders is being added:
In this example, the Type name has been set to
COLUMN_GLIDERS - by convention the column names are of this form: COLUMN_XXX.
The next field is the actual column heading to be used, and the field after
that says what kind of a column it is:
You can choose from Date, Hours, Counter, or Text.
Using
The Report Window
The Report window allows you to summarize your pilot
time in various aircraft types. The window has two halves. The left half is the
summary of all your pilot time, broken into several time periods: all flight
within the last 30 days, 90 days, 6 months, 1 year, and regardless of date.
The right half contains all the aircraft types you have
entered in COLUMN_MODEL.
Notice that not only can you use the window resize
handle in the lower right to resize the size of the window, but you can also
grab the splitter between the left and right half to change the amount of space
dedicated to each part of the window. For instance, here is the same window
with more space given to the aircraft type selection:
Notice that since there is now not enough space to
display all the columns, a scroll bar has appeared so that you can scroll the
left side left and right to see all the columns.
Selecting
Aircraft Type To Summarize
Check the aircraft types you want summarized, and the
totals will reflect just those aircraft types. For instance, when I want to
summarize my turbine helicopter time, I highlight just the Bell and Sikorsky
types because I know those are the only models I fly that are turbine powered.
Note that because over time I’ve used 206B3, 206BIII,
B206, and B206B3 all to mean Bell 206 JetRanger, I have to check them all. I
could go back and fix the entries to be all the same string, but it doesn’t
really cause any harm except that I have to check a few more boxes.
At the top of the right side there are two buttons
labelled “Enable All” and “Disable All”:
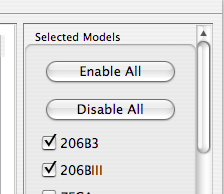
This allows you to quickly enable or disable all the
aircraft type checkboxes.
Importing
Existing Logbooks
From Excel
Format Of The XML File - To be supplied
Release Notes
Release 0.92
• Major
work on the date field. You can now just enter the date freehand if you want
(2/2/1994) but make sure to type a 4 digit year! You can still get the context
menu by right clicking (or Ctrl-Clicking if you have a one button mouse).
Previously if you wanted the calendar popup you had to click on the “arrow”
inside the date field. Now, just hold down open while right clicking (or
Ctrl-clicking) the date field. The option modifier will cause the calendar
popup to appear instead of the context menu.
• Realized
that it was pretty stupid to use Command-P for anything except “Print” so I
changed the name of the “Previous” command to “Grab” and changed the shortcut
to Command-G.
• Added
the ability to print. You can only print from the current logbook - if you want
to print pages from a different logbook simply change to display a page from
that logbook and then select “Print”. Report printing does not yet work.
• Upgraded
the maximum number of columns in a logbook from 20 to 30
• Allow
you to rename the display name of a column by just double clicking it (but you
can’t change the internal column name
this way).
• Fixed
up cut/copy/paste to work more reliably, including being able to cut/paste
rectangular groups of cells.
Release 0.8
• Fixed
a bug when importing Excel files - some times were rounded incorrectly giving
wrong summary values.
• Improved
mouse-wheel characteristics with numeric cells
• Added
the AutoFill and Previous commands to speed data entry
• Improved
the Date context menus. When you are working in the past (say, when you are first
entering an old logbook from a previous year) the context menu will use all 14
entries to hold old dates. Only when you are working on entries in the current
year will it split the context menu to be 7 old and 7 new dates.
• Shortened
the context menu for text fields. I found that with tail numbers, the long
context menu (15 entries) got too confusing to read. It was faster to type in
an N-number than it was to read the entire list. The list is now 9 entries
long.
• First
version built for Windows as well as Macintosh.
Release 0.6
• Added support for translating the program into other languages. With the help of Daniel Lavocat, release 0.6 contains support for the French language. If people would like to help with a translation into another language, please contact me.
• Fixed problems with “Clear Logbook” not updating properly.
Release 0.5
• You
can now change the way a column name is displayed. This was requested by
someone working in a different language (French) who wants to be able to change
the column headings to his native language.
• Fixed
some of the context menus to do a better job of selecting values from which you
can pick.
• When
you are in your latest logbook, the right arrow navigation button will now let
you move to page numbers higher than the highest filled in page.
Release 0.4b
• Made
a change to the storage format. In order to support hours:minutes data entry,
the XML file format was changed to
store all times in minutes (which is, in retrospect, what it should have been
all along). The program will automatically patch the file when it detects the
old file format, and convert it to the new format. You should probably back up
your logbook file just in case there is a problem with the conversion.
• Fixed
a bug where you could not enter “.2” and instead had to type “0.2”.
• Added
a help menu “QtLogbook Help” which just opens up this file in your web browser.
• Added
a Preferences pane
• Added
a preference to allow you to see dates as MM/DD/YYYY or DD/MM/YYYY (which is
how Europe formats dates).
• Added
a preference to allow you to specify/display time as either hours decimal
tenths of hours, or as hours colon minutes (1:24). When you are in this format,
the columns are slightly wider to allow you to fit 10,000 hour times along with
two digits of minutes. This means that when you run in this mode, you’ll need
to make your window a little wider (but the program will remember the new width
once you change it).
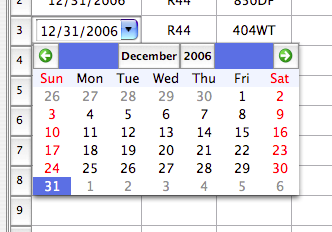
• Changed
the date combo box - instead of the silly up/down arrows, you now get a pull
down arrow which will put up a miniature calendar which you can pick the date
from:
Known Bugs:
• Just
clicking in some fields will make the program think the logbook has been
changed, even when you haven’t changed anything. In other cases, changing some
things does not cause the program to realize you have changed anything. use
File->Save to save the changes.
• During
testing I have seen one case where adding a custom column caused the program to
die while writing out the XML file, and thus all logbook data was lost. I plan
on adding an automatic backup feature to the program, but in the meantime you
should make a copy of the logbook file on a fairly frequent basis.